Entries in SPServices (5)

Monday
Jun242013

Banner with Quick Access to Search a SP2010 List

This is a quick piece of script and HTML that I threw together to help make it easier for our users to search a list or library in SharePoint when they were on a view page. Once added to your environment you can add this to the top of any view and it will both display the name of the list in the banner and dynamically set itself up to search the list/library that the hosting view lives on.

There is a search control included in SharePoint but this saved a few steps (clicks) we thought might be critical in getting people to use search more often and it makes for a nice custom banner to boot. With a little tweaking you can further change the banner text, the control's watermark and the banner image. With a few small changes this could also have the scope set to the site instead of a list.

All of the code, images and documentation for deployment is in the accompanying .zip file. Let me know in the comments if you have further suggestions.

DOWNLOAD SEARCH BANNER

//Kevin

Wednesday
Apr032013

Metro-Style Easy Tabs for SharePoint 2010

This is an item I flashed a development iteration of to the group in my Richmond SharePoint Saturday presentation and have since cooked up what is called 'V2' of the effort but is really the first version that I've made available. This approach just simplifies the initial version by making the tile's images all the same, though I did add a dynamic element to the colors. I'm not yet sure if that is a good idea, so I have instructions below to turn that off if you'd like. This is all based on the brilliant client-side Easy Tabs script that I just modified and simplified for the new visual style.

You can deploy these as you would 'normal' Easy Tabs for SP, my instructions for using the original script are here though you'll want the new code as it is not in that package:

Want to kill the random tile colors? Yeah, can't say I blame you...

Edit line #108 in the file from this:

var colorNumber = 1 + Math.floor(Math.random() * 9); // random start 1-9

to this (where the '1' can be any number from 1 to 9) :

var colorNumber = 1;


I may make more versions of this, including one allowing for a single color for the tiles.  Let me know if there is a feature that you might like that I should consider.  I'm not sure yet how to reliably incorporate custom images per tab (that make sense to the tab's context) without the end user editing the script and violating the plug and play goal here.

This version looks like the above screenshot with both a hover effect and a visualization for selected items.  Over-n-out.

Tuesday
Jan152013

A Fresh Visualization for SharePoint Calendars with SPServices

This is a set of scripts that can be dropped into a SharePoint 2010 deployment to allow for an alternate view of calendar lists.

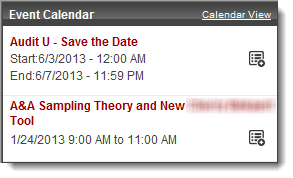
There was also a request to color cancelled items that the user had on the calendar so I've left that code in there. The widget display start and end times as well as alter the behavior for those events that span days. I also added CAML support so you can provide your own query to it if you want or just you the built-in default. There is a separate CSS file to do your own styling and a few images that I use. One is optional and controlled by the arguments to the script.

I chose to set this up to live in our farm's common repository and be called relatively easily from any page so you see 2 files here, one being the LoadCalendarWidget function and the other being the code we drop into a page to create the calendar control. Options/args you pass to the function are:

  1. Site's URL, no end '/' character
  2. List name
  3. Title to appear for the webpart
  4. GUID of your calendar list
  5. # of results to show
  6. Optional CAML query to use
  7. Indicator to show icon or use 'Add to Outlook' text instead

If you want to keep it simple and not place file directly on your farm's servers, the zipped package below has all of the files needed and is just about ready-to-use for a dirt-simple deployment.  There is a PDF included that contains instructions on use that are a little more detailed than in the posting that follows.

Download all code and images used here.

This is the code we call to create the control. I house this in a text file in a library and add to the page in a CEWP as the 'Content Link'.

<!-- jQuery -->
<script type="text/javascript" src="https://myfarm/_layouts/1033/jquery.SPServices-0.7.2.min.js"></script>
<script type="text/javascript" src="https://myfarm/_layouts/1033/jquery.dateFormat.js"></script>
<!-- Calendar Widget -->
<script type="text/javascript" src="https://myfarm/_layouts/1033/jquery.SPS.Calendar_Widget-1.0.js"></script>
<link href="/_layouts/1033/styles/Calendar_Widget.css" type="text/css" rel="stylesheet" />
<script language = "javascript">
	$(document).ready(function() {		
		LoadCalendarWidget("https://myfarm/hr/", "Upcoming HR Events Calendar", "Event Calendar", "{B7FE9372-9724-4504-9699-DEDD445B1BA3}", 8, ,true);	
	});	
</script>
<div id="cw_TopContainer" style="margin-bottom:15px;"><div id="cw_HeaderContainer"><table style="width:100%;"><tr><td><span id="cw_HeaderTitle"></span></td><td style="text-align:right;"><a id="cw_HeaderLink" href="#" >Calendar View</a></td></tr></table></div><div id="cw_ItemsContainer" /></div>

And this is the function. I put it in our 14 hive for access across the farm, you put it where you want, just make sure the script source in the code above points to where you dropped this.

// REQUIRES:
// - jquery-1.8.0.js or higher
// - jquery.SPServices-0.7.2.min.js or higher
// - jquery.dateFormat.js

function LoadCalendarWidget(cw_SiteUrl, cw_ListName, cw_ListNameForHeader, cw_EncodedListGuid, cw_ReturnRowCount, cw_CAML , cw_ShowIcon)
{
	// USAGE: --------------
	// cw_SiteUrl = "https://myfarm/hr/"; // Site's URL, no end '/' character
	// cw_ListName = "HR Events Calendar"; // List name
	// cw_ListNameForHeader = "Upcoming HR Events";  // what will appear in webpart
	// cw_EncodedListGuid = "{B7FE9372-9724-4504-9699-DEDD445B1BA3}";  // GUID of your calendar list
	// cw_ReturnRowCount = 15;  // # of results 
	// cw_CAML = Your optional CAML query
	// cw_ShowIcon = true;  // false will use 'Add to Outlook'

	var cw_ListUrlForHeader = cw_SiteUrl + '/lists/' + cw_ListName;
	var cw_IcsEventPath = cw_SiteUrl + "/_vti_bin/owssvr.dll?CS=109&Cmd=Display&List=" + cw_EncodedListGuid + "&CacheControl=1&Using=event.ics&ID=";
	var cw_ListItemDetailPath = cw_SiteUrl + "/Lists/" + cw_ListName + "/DispForm.aspx?ID=";
	var cw_CamlQuery = "";
	if (cw_CAML.length < 2) {
		cw_CamlQuery = "<Query><Where><Geq><FieldRef Name='EventDate' /><Value IncludeTimeValue='TRUE' Type='DateTime'><Today/></Value></Geq></Where></Query>";}
	else { cw_CamlQuery = cw_CAML; }

	// format header info
	$('#cw_HeaderTitle').html(cw_ListNameForHeader);  // title
	$('#cw_HeaderLink').attr('href',cw_ListUrlForHeader); // link
	
   $().SPServices({
		operation: "GetListItems",
		webURL: cw_SiteUrl, 
		listName: cw_ListName,
		async: false,
		CAMLRowLimit: cw_ReturnRowCount,
		CAMLQuery: cw_CamlQuery,	 
	 
		completefunc: function (xData, Status) {							
		   $(xData.responseXML).SPFilterNode("z:row").each(function() {				
				var cw_id = ($(this).attr("ows_ID"));
				var cw_title = ($(this).attr("ows_Title"));
					if(cw_title.length == 0) {cw_title = 'No event title.';}
					
				// By request, if an item is canceled, make that fact stand out.
				cw_title = cw_title.replace("Deleted:","<span class='cw_canceled'>DELETED:</span> ");
				cw_title = cw_title.replace("DELETED:","<span class='cw_canceled'>DELETED:</span> ");
				cw_title = cw_title.replace("Cancelled:","<span class='cw_canceled'>CANCELLED:</span> ");
				cw_title = cw_title.replace("CANCELLED:","<span class='cw_canceled'>CANCELLED:</span> ");
				
				// Clean up date formats				
				var cw_startdateday = 		$.format.date(($(this).attr("ows_EventDate")), "M/d/yyyy");
				var cw_startdatetime = 		$.format.date(($(this).attr("ows_EventDate")), "h:mm a");
				var cw_startdate = 			cw_startdateday + ' - ' + cw_startdatetime;
				var cw_enddateday = 		$.format.date(($(this).attr("ows_EndDate")), "M/d/yyyy");
				var cw_enddatedaytime = 	$.format.date(($(this).attr("ows_EndDate")), "h:mm a");
				var cw_enddate = 			cw_enddateday + ' - ' + cw_enddatedaytime
				
				var cw_CX = '<div class="cw_item">';
				if(cw_startdateday == cw_enddateday)  // single day event
				{
					cw_CX += '<table width="100%" cellpadding="0">';
					cw_CX += '<tr><td colspan="2"><a href="' + cw_ListItemDetailPath + cw_id + '" target="_new" class="cw_title">' + cw_title + '</a></td></tr>';					
					cw_CX += '<tr><td><span class="cw_time">' + cw_startdateday + ' ' + cw_startdatetime + ' to ' + cw_enddatedaytime +'</span></td>';
					cw_CX += '<td align="right" valign="top"><a href="' + cw_IcsEventPath + cw_id + '" target="_new">';					
					if(cw_ShowIcon) {
						cw_CX += '<img src="FARM/Images/add_item.png" class="cw_addIcon" title="Add to Outlook Calendar" /></a></td></tr>'; 
					}
					else { cw_CX += '[Add to Outlook]</a></td></tr>'; }						
					cw_CX += '</table>';
				}
				else // multi day event
				{
					cw_CX += '<table width="100%" cellpadding="0">';
					cw_CX += '<tr><td colspan="2"><a href="' + cw_ListItemDetailPath + cw_id + '" target="_new" class="cw_title">' + cw_title + '</a></td></tr>';					
					cw_CX += '<tr><td><span class="cw_time">Start:' + cw_startdate + '</span></td><td align="right" rowspan="2" valign="top"><a href="' + cw_IcsEventPath + cw_id + '" target="_new">';
					
					if(cw_ShowIcon) {
						cw_CX += '<img src="https://cbhq.cbh.com/_layouts/images/myelite2/cal/add_item.png" class="cw_addIcon" title="Add to Outlook Calendar" /></a></td></tr>';
					}
					else { cw_CX += '[<a href="' + cw_IcsEventPath + cw_id + '" target="_new">Add to Outlook]</a></td></tr>'; }						
					cw_CX += '<tr><td><span class="cw_time">End:' + cw_enddate + '</span></td></tr>';
					cw_CX += '</table>';				
				}				
				cw_CX += '</div>';
				$("#cw_ItemsContainer").append(cw_CX); // insert into DOM						
		   }); // -- $(xData.responseXML).find   
		} // -- completefunc
   }); // -- $().SPServices({
} // -- LoadCalendarWidget()
Thursday
May242012

Making SharePoint look like a million bucks on a shoestring budget - Part II

AKA the sexy, animated, customizable alerts bar you can have for 6 bucks.

In the second installment of our using jQuery, SPS and some inexpensive UI controls we implement a beautiful, customizable alerts/notification bar for SharePoint, driven off of a SharePoint list that'll set you back $6 and take your lunch hour to implement.  Very little configuration is needed to get you up and rolling here and, staying true to a tennant of this series, there is no requirement to install any invasive files (solutions) on your server or farm.  

As shown here it will handle multiple alerts being active at the same time and will default to a generic theme if there is more than one alert.  What you do not see here is the slick behavior of this notification bar and the options it exposes, see a demo of all that the bar does here.

 
First a few Resources needed:
  • The notification bar ($6), officially named 'FooBar - A jQuery Notification Bar'
  • jQuery (consider putting this reference in your master page)
  • SPServices (also consider putting this reference in your master page) 
SharePoint List:
I created a simple custom list (System Alerts) with the following columns, if you use other names just reflect that in lines 36-38, if you don't know the ows_X field name uncomment line 23 to see.
  • IsActive - a yes/no data type
  • Theme - String datatype, required - I made this a choice and provided canned options
  • Message - Multiple lines of text datatype, plaintext or not
The code below:
This I dropped into a text file and just added to a page via a CEWP letting me choose on which pages this is displayed, in our case just the home page.  Note the mention of an image as part of the theme, you can whip your own up or just remove the text in line 85 (and comma in 84 then).  The screenshot above shows how nice this looks with a good image though.
<style> <!-- A few canned styles, go nuts here -->
	.foobar_darktext{ font-weight:bold; color:black; }
	.foobar_lighttext{ font-weight:bold; color:white; }	
</style>
<!-- For jQuery -->
	<script type="text/javascript" src="/_layouts/1033/jquery.SPServices.min.js"></script>
	<script type="text/javascript" src="/_layouts/1033/jquery.min.js"></script>
<!-- For Foobar -->
	<script type='text/javascript' src='/_layouts/1033/jquery.foobar.min.js'></script>
	<link href='/_layouts/1033/styles/jquery.foobar.css' type='text/css' rel='stylesheet' />

<script language = "javascript">
$(document).ready(function() 
{
	$().SPServices(
	{
		operation: "GetListItems",
		webURL: "https://YOUR_SHAREPOINT_SITE",    
		async: false,
		listName: "YOUR_LIST_NAME",
		completefunc: function (xData, Status) 
		{
			//alert("Response from server: " + xData.responseText); // helpful for debug
			var output = "";
			$("#WSOutput").html(output);
			
			var iCounter = 0;
			var arrPayload = [];
			var szBackHexColor = '';
			var szAppliedStyle = '';
			var szPathAlertImage = 'https://SOME_SHAREPOINT_PATH/AlertImages/';
			var szFullPathAlertImage = '';
			
			$(xData.responseXML).find("[nodeName='z:row']").each(function() { 
				
				var szContent = ($(this).attr("ows_Message"));				
				var bIsActive = ($(this).attr("ows_IsActive"));
				var szTheme = ($(this).attr("ows_Theme"));				
				
				if(bIsActive == 1)
				{				
					arrPayload.push(szContent);
							
					switch(szTheme) // set theme options
					{
						case 'Theme A':
							szBackHexColor = '#ffcc00';
							szAppliedStyle = 'foobar_darktext';
							szFullPathAlertImage = szPathAlertImage + 'Achtung.png';							
							break;
						case 'Theme B':
							szBackHexColor = '#CAF87A';
							szAppliedStyle = 'foobar_darktext';
							szFullPathAlertImage = szPathAlertImage + 'Danger Will Robinson.png';	
							break;							
					}					
					szFullPathAlertImage = '<img style=\' padding:0px 0 0 7px; \' src= \'' + szFullPathAlertImage + '\' />';
					iCounter++;  // increment
				}
			});
			
			if(iCounter > 1) // to prevent conflicting themes, make this a generic visual
			{
				szBackHexColor = '#ffcc00';
				szAppliedStyle = 'foobar_darktext';
				szFullPathAlertImage = szPathAlertImage + 'Generic Alert.png';			
			}
			
			if(iCounter > 0) 
			{
				$.foobar({
					"positioning" : "fixed",
					"display" : "delayed",
					"displayDelay" : 2000,
					"messagesDelay" : 5000,
					"messagesScrollSpeed": 50,
					"messagesScrollDelay": 2000,
					"messageClass" : szAppliedStyle,
					"fontColor" : szFontHexColor,
					"backgroundColor" : szBackHexColor,
					"buttonTheme" : "long-arrow",
					"height" : 35,
					"enableShadow" : false,
					"messages" : arrPayload,
					"leftHtml": szFullPathAlertImage
				});	
			}
		}
	});
});	
</script>
<div id="x_container" />
Further fiddling:
Initially I set this up so that the user could specify the background color, the text color, select an image or provide a URL, etc. All of which are done the same way as the theme logic but we decided to simplify the user experince with themes rather than give them so many choices.  You can easily expand on this though.
Consider throwing a few bucks at the jQuery and/or SPServices teams via the donate links on their sites, they do good work and deserve some help. I am not affiliated with any of the groups/sites I steer you toward in these posts...


Thursday
May102012

Using SPServices, jQuery and an $8 Tab Plugin to Create a Stunning SharePoint List Visualization

AKA: Making SharePoint look like a million bucks on a shoestring budget - Part I

I'd been wanting to spend some time getting familiar with the brilliant open source jQuery library for SharePoint's web services, SPServices, and had the opportunity this past week.  We had a SharePoint site under construction that needed to have a list of links and a little explanation to accompany them  and initially just hosted a standard grouping mechanism on the list view which looks terrible.  I thought that this might be a chance to offer a better way to visualize list data using an inexpensive tabbing control in my library.  The result is shown below, with each 'tab' here linking to 3 fields from a custom list, the title, the sub-title and the content.  This stays in our needed model of users interacting with the standard SP forms that they understand and is leaps and bounds a better user experience.  If this takes you more than a lunch break to implement you might need longer lunch breaks, this is an easy setup and looks great, even responding to mouse-wheel scrolling through the tabs.


To do this I used a stunning jQuery plugin called 'Sliding Tabs' that I bought from CodeCanyon.net for a dirt cheap 8 bucks (authored by 360north).  You can see/buy it here and it is one of the many ridiculous bargains on that site that I'll be extending in future posts.  That 8 dollars is all this costs and it looks like $1,000,008 when done.  You'll also need to grab the jQuery file and the SPServices file, we have these hosted on our farm and embedded in the master page for ease of use as seen in the includes in the code.  All includes that are needed but the core jQuery and SPServices files come with the Sliding Tabs package.

With the code in hand from them I created a new list with the aforementioned title, subtitle and content (being a rich content type) list and hooked it up.  Full code follows below.

Notice in the code that you have to specify your site and list names (lines 13 and 15) and if you name your columns something other than I did, you'll need to change the mappings to the 'ows_XXX' moniker that matches your fields (lines 26, 28 and 30).  If you are unsure of what your field's names are you can uncomment line 20 and see for yourself.

You can change the size, shape, orientation and other options with the tab control with the options section starting at line 58.  It does not handle overflow well (um, not at all really, it just gets clipped) but for what we needed it was perfect.


<script type="text/javascript" src="_layouts/1033/jquery.min.js"></script>
<script type="text/javascript" src="_layouts/1033/jquery.SPServices.min.js"></script>
<script type="text/javascript" src="_layouts/1033/jquery.mousewheel.js"></script>
<script type="text/javascript" src="_layouts/1033/jquery.slidingtabs.pack.js"></script>
<script type="text/javascript" src="_layouts/1033/jquery.easing.js"></script>

<link href="_layouts/1033/styles/slidingtabs-vertical.css" rel="stylesheet" type="text/css" media="screen"/>

<script language = "javascript">
$(document).ready(function() {
	$().SPServices({
		operation: "GetListItems",
		webURL: "https://MY_SHAREPOINT_ROOT/SOME_SITE",    
		async: false,
		listName: "SIMPLE DEMO LIST",
		completefunc: function (xData, Status) {

			//alert("Status of XML message reaching Sharepoint webservice: " + Status); // handy for debug
			//alert("Response from server: " + xData.responseText); // also handy for debug
			var output = "";
			$("#WSOutput").html(output);
			var TabCounter = 0; // to keep track of tabs/containers

			$(xData.responseXML).find("[nodeName='z:row']").each(function() {

				var title = ($(this).attr("ows_Title"));
					if(title.length == 0) {title = ' ';}
				var subtitle = ($(this).attr("ows_Subtitle"));
					if(subtitle.length == 0) {subtitle = ' ';}
				var content = ($(this).attr("ows_Content"));
					if(content.length == 0) {content = ' ';}
				 
				var TabClass = 'st_tab';
				var ContainerClass = 'st_tab_view';
						
				if(TabCounter==0) // our first items get special 'active' class styling
				{				
					TabClass = 'st_tab st_tab_active';
					ContainerClass = 'st_tab_view st_first_tab_view';
				}
				// Create new tab element as <li>
				var TabHeader = '<li><a href="#stv_content_' + TabCounter + '" rel="v_tab_' + TabCounter + '" class="' + TabClass + '">'
					TabHeader += title + '<span>' + subtitle + '</span></a></li>';
				$("#tablisting").append(TabHeader); // insert into DOM

				// Create new lined content container as <div>
				var stv_content = '<div id="stv_content_' + TabCounter + '" class="' + ContainerClass + '" style="overflow:auto;">';
					stv_content +='<h2 class="sc_title">' + title + '</h2><div class="text"><p>' + content + '</p></div></div>';			
				$("#st_tabs_container").append(stv_content); // insert into DOM

				TabCounter++;  // increment counter
			});
		}
	});
	   
	// Instantiate Vertical Sliding Tabs
	$('div#st_vertical').slideTabs({  			
		// Options
		contentAnim: 'slideH',
		contentAnimTime: 600,
		contentEasing: 'easeInOutExpo',
		orientation: 'vertical',
		tabsAnimTime: 300,
		totalWidth: '660',		
		tabScroll: true				
	});
});	
</script>
       
<!-- Start HTML - Vertical tabs -->
<div id="st_vertical" class="st_vertical">
	<div class="st_tabs_container">   
		<a href="#prev" class="st_prev"></a>
		<a href="#next" class="st_next"></a>                                                                    
		<div class="st_slide_container">            
			<ul class="st_tabs" id="tablisting"></ul><!-- tabs inserted here -->               
		</div> <!-- /.st_slide_container -->
	</div> <!-- /.st_tabs_container -->                               
	<div class="st_view_container">        	            
		<div class="st_view" id="st_tabs_container"></div> <!-- content blocks inserted here -->                        
	</div> <!-- /.st_view_container -->
</div> <!-- /#st_vertical -->
<!-- End HTML - Vertical tabs -->
More jQuery visual enhancements to come...